The island is the single most requested feature in the kitchens we design. Homework happens there. Wine gets poured there. Guests stand around it for three hours while the host cooks four feet away. A kitchen island with seating is not really a countertop, it is where the household actually congregates.
It is also where remodels go wrong most often, and the reason is arithmetic.
Homeowners arrive with a saved photo of a gorgeous island and no idea that the room in the photo is nineteen feet wide. Their kitchen is eleven. Nobody told them that an island with stools needs clearance on two sides for two entirely different reasons, or that a 15-inch overhang in 3cm quartz will crack without steel underneath it.
This guide covers the numbers we actually build to: clearances, overhangs, seating widths, layouts, the upgrades worth paying for, and the mistakes we get called in to fix. Every dimension comes from the National Kitchen & Bath Association planning guidelines or from current code, and we have noted which is which.
How Much Space Do You Need for a Kitchen Island With Seating?
As a working minimum, a kitchen needs roughly 12 feet of clear width to hold an island with seating, and closer to 15 feet if cabinetry runs along both opposing walls. Below that, you are building an obstacle.
That number comes from stacking the required clearances rather than guessing. Here is the stack for a typical Austin kitchen with one run of cabinets, an island, and stools:
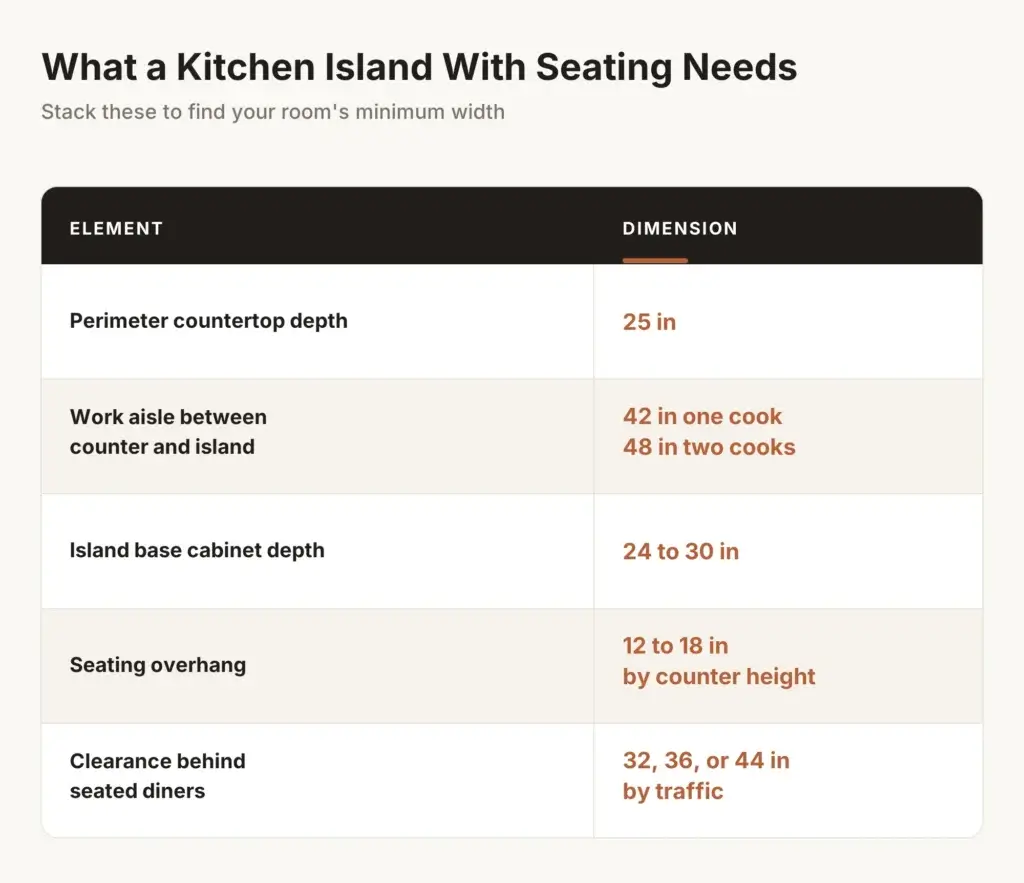
Add the middle column for a single-run kitchen and you land around 145 inches, or just over 12 feet. Put cabinets on the far wall too and you are at roughly 178 inches, close to 15 feet. Measure your room before you fall in love with anything.
Work Aisles and Walkways Are Not the Same Thing
This is the distinction most island guides blur, and blurring it is how kitchens end up unusable.
A work aisle is floor space where somebody stands and works, such as the gap between the island and the range wall. NKBA calls for at least 42 inches for a single cook and at least 48 inches when two people cook at once. Dishwasher and oven doors swing into this space, which is the real reason for the number.
A walkway is a path people simply pass through, with no appliance opening into it. The minimum there is 36 inches.
Clearance behind seated diners is a third rule entirely, and it is measured from the counter edge, not from the cabinet. Allow 32 inches if nobody passes behind the stools, 36 inches if someone needs to edge past, and 44 inches if people will walk past normally. In an open-concept Austin kitchen where the island faces the living room, assume 44.
Miss this last one and you get the classic failure: a beautiful island where anyone seated has to stand up and push their stool in every time someone crosses the room.
Seating Width and Knee Clearance
Allow 24 inches of width per person. That is the NKBA minimum and it is a minimum, not a target. Four stools means 96 inches of uninterrupted island length devoted to seating, plus whatever counter you want beyond it. Two stools means 48 inches.
Knee depth is set by counter height, and the relationship is inverse. The higher the counter, the less overhang you need, because the stool sits further under it.
- 30-inch table height: 18-inch deep knee space
- 36-inch standard counter height: 15-inch deep knee space
- 42-inch bar height: 12-inch deep knee space
Standard 36-inch height is what we build most often now. It keeps one continuous countertop plane, it reads cleaner than a two-tier island, and counter stools with 24 to 26 inch seats are far easier to find than bar stools. Leave 10 to 12 inches between the seat and the underside of the counter or the seating will feel cramped regardless of the overhang.
The Overhang Rule Nobody Mentions on Pinterest
Here is the detail that separates a remodeler from a reel. Stone cannot cantilever indefinitely.
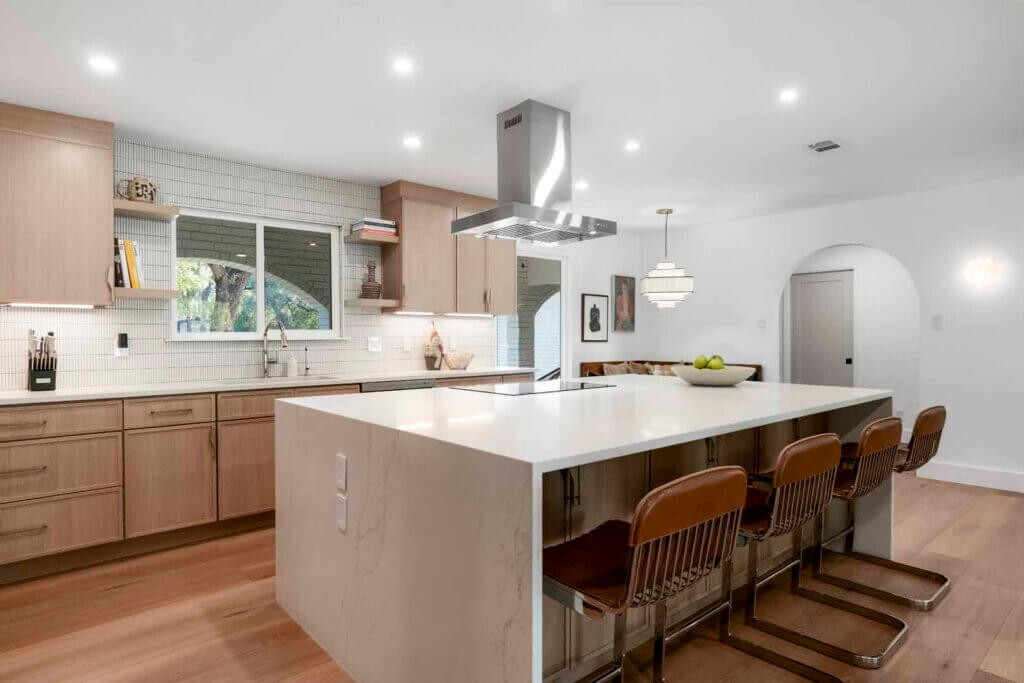
Industry fabrication guidance puts the unsupported limit at roughly 10 inches for 3cm material and about 6 inches for 2cm. A 15-inch overhang at standard counter height therefore requires structural support, whether that is steel plate brackets buried in the cabinet, hidden countertop supports, or visible corbels.
Skipping it does not fail immediately. It fails in year three when somebody leans on the corner, and quartz does not repair invisibly.
Steel plate is what we specify in most cases, because it supports the stone without putting anything in the knee space that a seated person will kick.
Choosing the Right Kitchen Island Seating Layout
Where the stools go changes how the room feels more than any finish decision.
Single-Sided Seating
Stools in a straight line along one long edge. This is the default, it suits standard rectangular kitchens, and it is the easiest layout to get right because the overhang runs in one direction and the structural support is simple.
The drawback is social. Everyone faces the same way, nobody can see each other, and it reads like a diner counter. Fine for homework and breakfast, less good for a party.
L-Shaped Seating
Wrap the seating around one corner so two or three stools run along the long edge and one or two turn the corner. The geometry does something small and significant: people can actually look at each other while they talk.
It is our standard recommendation for households that entertain, and it costs almost nothing extra beyond a slightly larger stone slab and support at the corner. The corner seat needs a full 24 inches of its own clear width measured along its own edge, which is where DIY layouts usually cheat.
Multi-Sided and Curved Seating
Seating on three sides, or a radiused end, works on large square or rounded islands in homes with real square footage. We build these most often in West Lake Hills, Lakeway, and Barton Creek primary kitchens where the island is genuinely the center of a great room.
Curves carry a cost. Radiused stone means template work and waterjet cutting, curved cabinet boxes are custom rather than standard, and the toe kick has to be built to match. Budget accordingly.
Separating the Prep Zone From the Dining Zone
The most common functional complaint we hear about existing islands is not about size. It is that the sink is eighteen inches from where the kids eat, so dirty dishes and homework share a surface.
Plan the island in zones from the outset. Put the sink or cooktop toward the end nearest the main cooking run, and keep a minimum of 18 to 24 inches of clear counter between the wet or hot zone and the first stool. If the island has a cooktop, NKBA calls for at least 9 inches of counter on either side of it, and you want the seating well outside that.
In long islands, a two-level top used to be the standard solution, raising the dining side to 42 inches so it screened the mess. Taste has moved toward the single-plane island, which means zoning now has to be done with distance instead of height.
Pro Design Upgrades Worth the Money
Waterfall Edges
Running the countertop stone vertically down one or both ends is the most effective way to make an island look designed rather than assembled. It works best with material that has visible movement, because the pattern should continue around the corner, which requires the fabricator to book-match from a single slab.
That is the catch. Waterfall ends consume significantly more material, often pushing you into a second slab, and mitered corners are skilled labor. Expect it to add meaningfully to the countertop line item rather than a token amount.
Contrasting Cabinetry
Painting the island a different color from the perimeter is the highest-impact, lowest-cost upgrade available on this list. Deep navy, forest or olive green, black, and natural white oak all work against a light perimeter, and the contrast gives the room depth that an all-one-color kitchen never achieves.
It also solves a practical problem in open-concept homes. The island is the piece of the kitchen the living room sees, so treating it as furniture rather than cabinetry helps it sit comfortably in a shared space.
Pendant Lighting, Sized Correctly
Pendants over an island are the most commonly botched detail in finished remodels. The rules are simple and almost nobody follows them.
Hang the bottom of each pendant 30 to 36 inches above the countertop. That keeps the light on the work surface and keeps the fixture above sightlines across the island. Space pendants 24 to 30 inches apart, and hold at least 6 inches back from each end of the island.
Two large pendants read better than three small ones on islands up to about 7 feet. Beyond that, three is usually right. As a sanity check, the combined width of the fixtures should be somewhere between a third and a half of the island’s length.
Put them on a dimmer. The island is a task surface at 7 a.m. and an ambient one at 9 p.m.
Hidden Storage Under the Overhang
The space behind the knee area on the seating side is usually dead. On a 15-inch overhang with a 24-inch deep base cabinet, you can reclaim some of it as shallow push-to-open drawers or a slim cabinet accessed from the seating side.
It will not hold your stockpots. It is excellent for placemats, table linens, board games, seasonal serveware, and the things that otherwise occupy a drawer you need for daily use. Specify push-to-open hardware so there are no pulls for knees to find.
What Are the Most Common Kitchen Island Mistakes?
The four failures below account for most of the islands we get called in to redesign.
Forcing an Island Into a Peninsula Kitchen
If the arithmetic earlier in this guide does not work in your room, the answer is a peninsula, not a smaller island.
A squeezed island makes a kitchen feel smaller than it did before the remodel, because the eye now reads a blocked floor instead of an open one. It also causes real damage over time: dishwasher doors, oven doors, and refrigerator doors that collide with island cabinetry chip finishes, bend hinges, and eventually stop closing properly.
This comes up constantly in 1920s bungalows in Hyde Park and Travis Heights, where the original kitchen simply does not have the width. A peninsula delivers the counter, the storage, and two or three seats without the clearance penalty.
Putting Seating in the Work Triangle
The path between refrigerator, sink, and range is a traffic corridor during cooking. NKBA guidance is explicit that major traffic patterns should not cross the work triangle, and seated guests are the most immovable obstacle you can place in one.
Orient the stools on the side of the island facing away from the primary work run, which in open-concept Austin homes usually means facing the living area anyway.
Getting the Outlets Wrong, Which Now Means Something Different
The code on this changed, and a lot of published advice has not caught up.
Earlier editions of the National Electrical Code required receptacles on islands based on countertop area, which is why so many kitchens have an outlet mounted on the side of the island cabinet beneath the overhang. The 2023 NEC reversed that. Island receptacles are now optional, and if you do not install one, the code requires a provision such as a junction box so one can be added later.
More importantly, the familiar below-counter side-mounted outlet is no longer the compliant default. The change came from a documented hazard: cords draped over an island edge get snagged, and children pull appliances down. Receptacles serving the island surface now belong above or within the countertop, using a listed pop-up or an in-counter assembly.
Which edition applies to your project depends on what your jurisdiction has adopted, and adoption is not uniform across Texas, so confirm the current edition with your building department or let your contractor handle it. GFCI protection applies to kitchen countertop receptacles regardless of edition.
Treating Plumbing in the Island as a Finish Decision
Adding a prep sink or dishwasher to an island is a structural and mechanical decision made at the planning stage, not a selection made from a showroom.
Nearly every Central Texas home sits on a concrete slab, so island plumbing means saw-cutting the slab, trenching, running supply and drain, then patching. That work commonly adds $2,000 to $5,000 before a single cabinet is set, and on a post-tension slab the cut has to be located carefully. Decide early or do not decide at all.
Does Your Austin Kitchen Have Room for an Island?
Often yes, and often only after a wall comes out.
The most common island project we run in Austin is not adding an island to an open kitchen. It is a 1950s or 1960s ranch in Allandale, Crestview, or Barton Hills where the kitchen is walled off from the living room. Remove and beam that wall and the room gains the width the clearances demand, which is why island work and load-bearing wall removal so often appear in the same scope.
For budget context, Austin kitchen remodels averaged near $63,000 in 2026, roughly 12% above the prior year, with cabinetry consuming 30% to 40% of a typical budget. An island is cabinetry, countertop, electrical, and sometimes plumbing all at once, so it is rarely a small line item. Structural and plumbing work also triggers permits and inspections, and the City of Austin’s Development Services permitting resources outline what applies.
The full NKBA planning guidelines referenced throughout this guide are published openly and worth a look if you want the source: NKBA Kitchen Planning Guidelines.
Getting the Math Right Before Anyone Swings a Hammer
A kitchen island with seating is a balance between what you want the room to look like and what the room will physically allow. Clearances, overhang support, appliance swings, slab plumbing, and outlet code are not design preferences. They are constraints, and the sequence matters: they get resolved on paper, or they get discovered during construction at considerably greater expense.
That is the argument for a design-build team. When the people drawing the island are the people building it, the clearances get checked against the actual framing and the actual slab before anything is ordered, and nobody is blaming another company when a dishwasher door hits a cabinet.
Together Design & Build runs design, material selections, permitting, and construction under one accountable team on a fixed-cost contract, from our studio at 6000 S Congress Ave where you can lay hands on the stone and the cabinet samples before committing.
Ready to see what is possible in your space? Schedule a free in-home kitchen remodel consultation and we will measure the room, run the clearances, check the slab and the walls, and tell you honestly whether your kitchen wants an island or a peninsula before you spend anything. You can also browse our completed Austin kitchen projects or ask about financing.
Call (512) 883-8401 or request your free estimate online.